Cloudera Desktop leverages the browser to provide users with an environment for exploring and analyzing data.
Building on top of the Cloudera Desktop SDK lets your application interact naturally with Hadoop, as well as the other services offered by Cloudera Desktop.
By building on top of Cloudera Desktop SDK, you get, out of the box:
This document will orient you with the general structure of Cloudera Desktop and will walk you through adding a new application using the SDK.
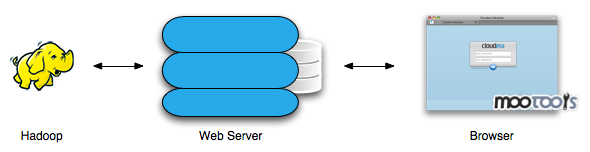
Cloudera Desktop, as a "container" web application, sits in between your Hadoop installation and the browser. It hosts all the Cloudera Desktop Apps, including the built-in ones, and ones that you may write yourself.
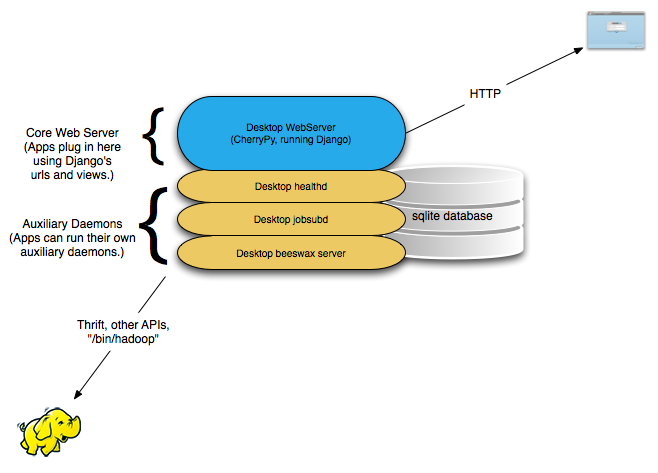
Cloudera Desktop is a web application built on the Django python web framework. Django, running on the WSGI container/web server (typically CherryPy), manages the url dispatch, executes application logic code, and puts together the views from their templates. Django uses a database (typically sqlite) to manage session data, and Desktop applications can use it as well for their "models". (For example, the JobDesigner application stores job designs in the database.)
In addition to the web server, some Desktop applications run daemon processes "on the side". For example, the Health dashboard runs a metrics collection daemon ("healthd"). Running a separate process for applications is the preferred way to manage long-running tasks that you may wish to co-exist with web page rendering. The web "views" typically communicate with these side daemons by using Thrift (e.g., for job submission) or by exchanging state through the database (e.g., when a job completes).
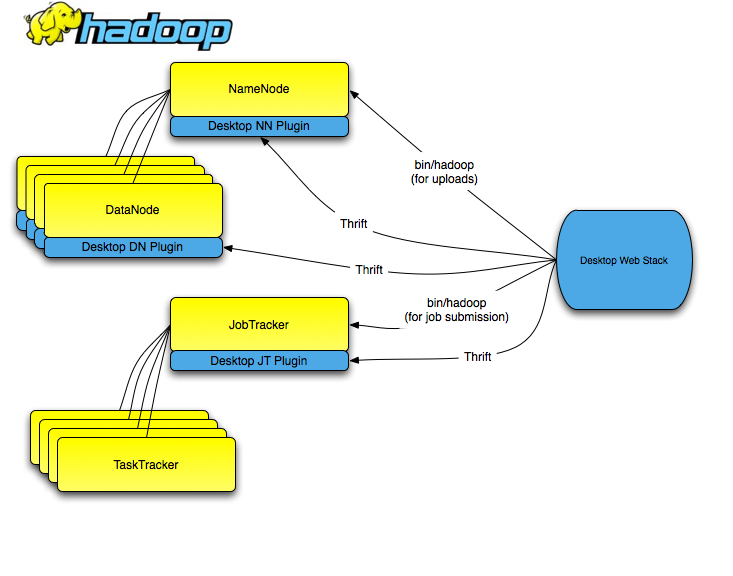
Cloudera Desktop provides some APIs for interacting with Hadoop. Most noticeably, there are python file-object-like APIs for interacting with HDFS. These APIs work by making Thrift calls to "plug-ins" running inside the Hadoop daemons. The Hadoop administrator must enable these plug-ins.
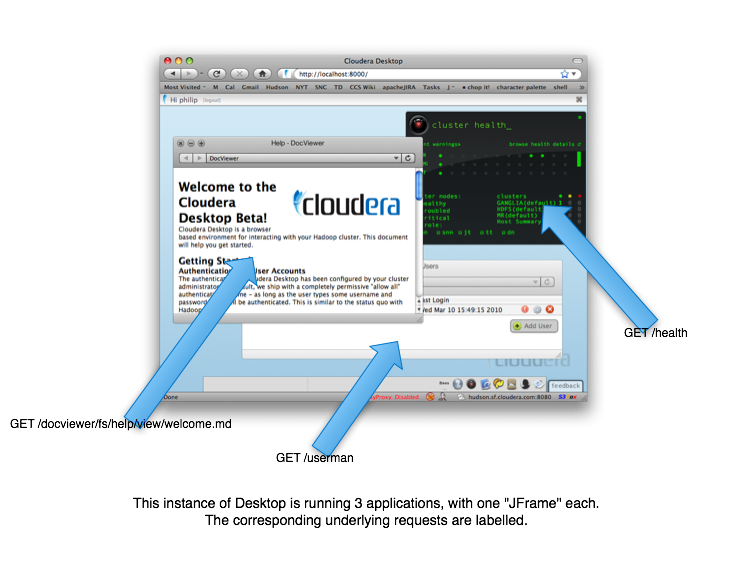
Cloudera Desktop provides a front-end framework allowing you to co-locate many logical applications within the same windowing environment. The essential pattern is that individual apps handle their own HTTP requests. The front-end renders the responses of those requests in windows within the same web page. We have dubbed these windows "JFrames".
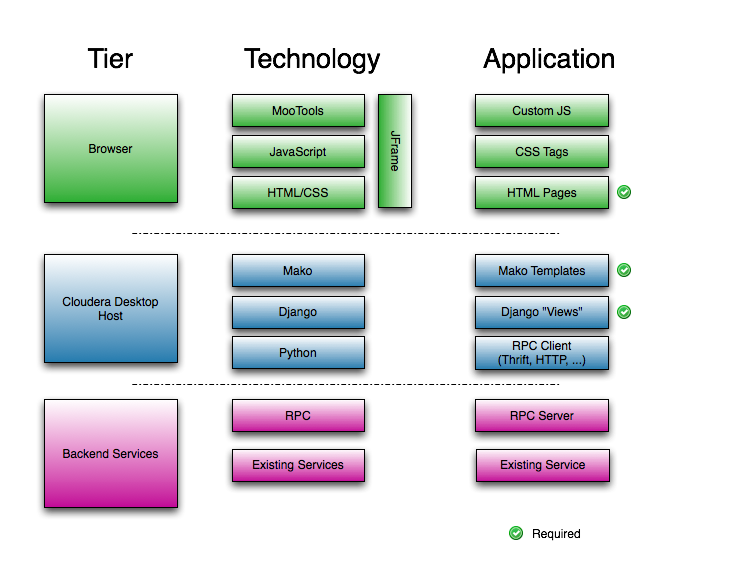
A Cloudera Desktop application may span three tiers: (1) the UI and user interaction in the client's browser, (2) the core application logic in the Cloudera Desktop web server, and (3) external services with which applications may interact.
The absolute minimum that you must implement (besides boilerplate), is a "django view" function that processes the request and the associated template to render the response into HTML.
Many apps will evolve to have a bit of custom JavaScript and CSS styles. Apps that need to talk to an external service will pull in the code necessary to talk to that service.
Developing for the Desktop SDK has similar requirements to running
Desktop itself. We require python (2.4, 2.5, or 2.6), Django (1.1 included
with our distribution), Hadoop (Cloudera's Distribution for Hadoop,
at least 0.20.1+152), Java (Sun Java 1.6), and Firefox (at least 3.0).
The following are core technologies used inside of Cloudera Desktop.
Now that we have a high-level overview of what's going on, let's go ahead and create a new installation.
The Cloudera Desktop SDK is available from http://archive.cloudera.com/desktop-0.4/downloads/cloudera-desktop-SDK-0.4.1.tgz. Once you've downloaded it, unpack it and build it.
    # Untar
    $ tar -xzf cloudera-desktop-SDK-0.4.1.tgz
    $ cd cloudera-desktop-SDK-0.4.1
    # Build
    $ export HADOOP_HOME=...
    $ make desktop
    # Run
    $ env/bin/desktop runserver_plus
    # Visit http://localhost:8000/ with your web browser.
    $ ./env/bin/desktop create_desktop_app calculator
    $ find calculator -type f
    calculator/setup.py                                                                 # distutils setup file
    calculator/src/calculator/__init__.py                               # main src module
    calculator/src/calculator/forms.py
    calculator/src/calculator/models.py
    calculator/src/calculator/settings.py
    calculator/src/calculator/urls.py                                       # url mapping
    calculator/src/calculator/views.py                                  # app business logic
    calculator/src/calculator/windmilltests.py
    calculator/src/calculator/templates/index.mako
                                                                                                            # Static resources
    calculator/src/calculator/static/art/calculator.png # logo
    calculator/src/calculator/static/bootstrap.js
    calculator/src/calculator/static/css/calculator.css
    calculator/src/calculator/static/help/index.md          # Help file
    calculator/src/calculator/static/js/package.yml         # Declaration of JS files
    calculator/src/calculator/static/js/Source/Calculator/Calculator.js # JS entrypoint
As you'll discover if you look at calculator's setup.py, Cloudera Desktop uses a distutils entrypoint to register applications. By installing the calculator package into Desktop's python virtual environment, you'll install a new app.
$ export ROOT=/path/to/desktop-SDK/
$ make -C calculator -f $ROOT/desktop/app.mk env-install
Congrats, you've added a new app!
    # If you haven't killed the old process, do so now.
    $ env/bin/python runserver_plus
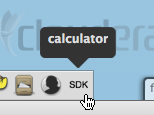
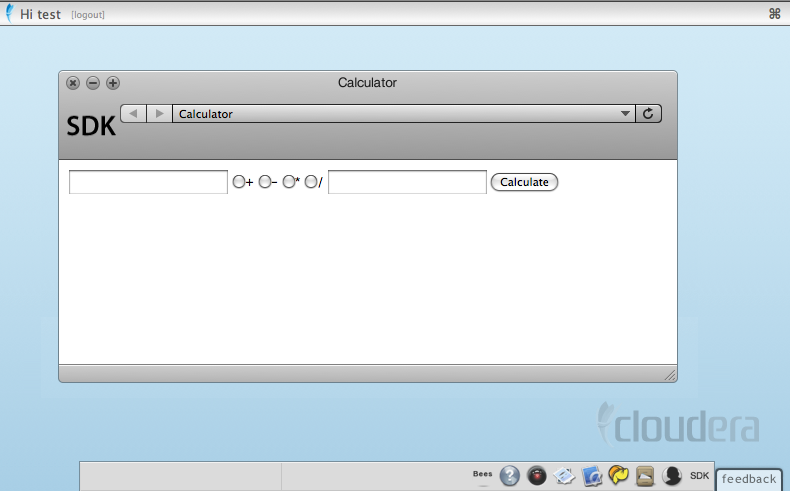
And then visit http://localhost:8000/ to check it out! You should see the app (with a boring "SDK" icon) in the dock, and clicking it will bring up a boring screen:
Now that your app has been installed, you'll want to customize it.
As you may have guessed, we're going to build a small calculator
application. Edit calculator/src/calculator/templates/index.mako
to include a simple form:
    <!DOCTYPE html PUBLIC "-//W3C//DTD HTML 4.01//EN">
    <html>
        <head>
            <title>calculator</title>
        </head>
        <body>
        % if op:
        <span>${a} ${op} ${b} = ${result}</span>
        % endif
        <form action=${url("calculator.views.index")} method=POST>
            <input name="a">
            <input type="radio" name="op" value="add">+</input>
            <input type="radio" name="op" value="subtract">-</input>
            <input type="radio" name="op" value="multiply">*</input>
            <input type="radio" name="op" value="divide">/</input>
            <input name="b">
            <input type="submit" value="Calculate">
        </form>
        </body>
    </html>
The template language here is Mako,
which is flexible and powerful. If you use the ".html" extension, Cloudera
Desktop will render your page using Django templates
instead.
Note that we used the url() function to generate the URL to the calculator
view. This trick protects you a bit from changing URLs.
Let's edit calculator/src/calculator/views.py to process that form:
    #!/usr/bin/env python

    from desktop.lib.django_util import render
    import operator

    OPS=dict(add=operator.add, subtract=operator.sub, multiply=operator.mul, divide=operator.truediv)
    OP_STRING=dict(add="+", subtract="-", multiply="*", divide="/")

    def index(request):
        if "op" not in request.REQUEST:
            return render('index.mako', request, dict())
        a = float(request.REQUEST["a"])
        b = float(request.REQUEST["b"])
        op = request.REQUEST["op"]
        result = OPS[op](a, b)
        return render('index.mako', request,
            dict(a=a, b=b, op=OP_STRING[op], result=result))
For more complicated forms, you may want to use Django Forms and
avoid explicitly using request.REQUEST, but this is shorter.
You can now go and try the calculator. If you set everything up right, you should see something like:
If you enter a number only in the first text box, you'll see
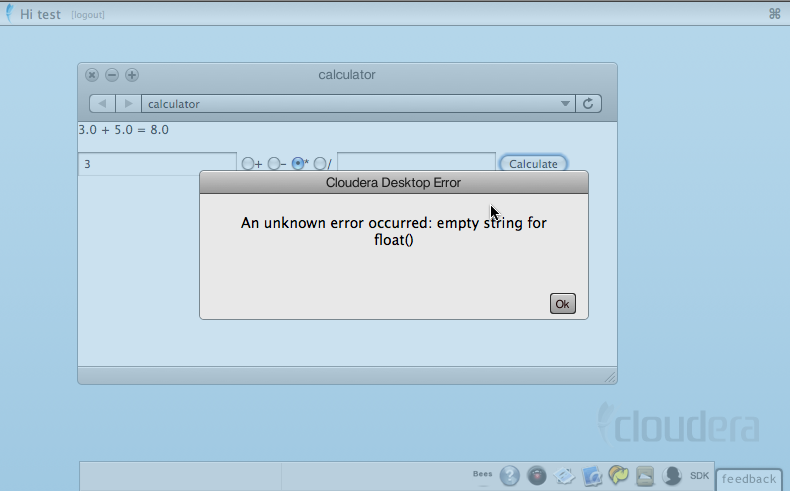
Cloudera Desktop noticed that an exception was thrown, and created a modal dialog error for you.
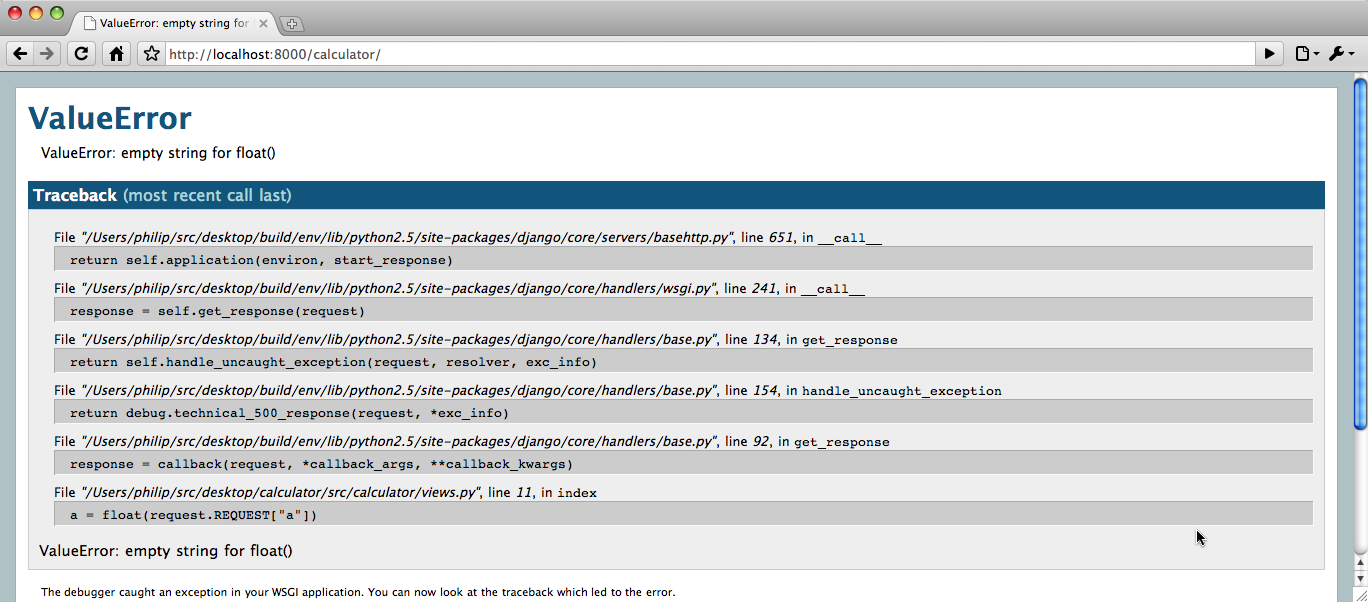
If you access the calculator URL at /calculator in your browser,
and if you're using
runserver_plus, you'll get a handy debugging page. You can click on any
stack frame to get a debugging console:
Great! Now that we've added a single application, we're going to delve further into the back-end.
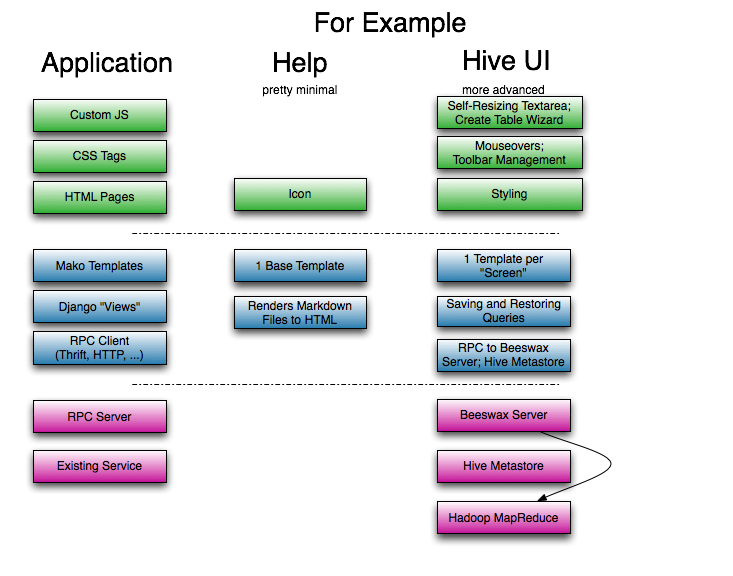
The Help application is as minimal as they get. Take a look at it!
The core logic is in the "views.py" file. The central function
there takes (app, path) (which are mapped from the request URL
by the regular expression in urls.py). The view function
finds the data file that needs to be rendered, renders it through
the markdown module, if necessary, and then displays it through
a simple template.
You'll note that the "Help Index" is presented in a "split view".
No Javascript was written to make this happen! Instead, the template
applied certain CSS classes to the relevant div's, and JFrame
did the rest.
Beeswax is on the opposite end of the complexity scale from Help.
In addition to many views (in views.py), Beeswax uses
Django Forms for server-side form validation (the forms are in forms.py),
several features of the Mako templating engine (especially includes and
functions), a separate server (implemented in Java), and significant
JavaScript for user interaction.
This section goes into greater detail on useful features within the Cloudera Desktop environment.
Except for static content, request.user is always populated. It is a
standard Django models.User object. If you were to set a breakpoint at the
index() function in our calculator app, you will find:
    >>> request.user
    <User: test>
request.user
gets populated. There's also a middleware for Cloudera Desktop that makes sure that no pages
are displayed unless the user is authenticated.
Cloudera Desktop uses a typed configuration system that reads configuration files (in an
ini-style format). By default, Desktop loads all *.ini files in the build/desktop/conf
directory. The configuration files have the following format:
    # This is a comment
    [ app_name ]                                # Same as your app's name
    app_property = "Pink Floyd"

    [[ section_a ]]                         # The double brackets start a section under [ app_name ]
    a_weight = 80                               # that is useful for grouping
    a_height = 180

    [[ filesystems ]]                       # Sections are also useful for making a list
    [[[ cluster_1 ]]]                       # All list members are sub-sections of the same type
    namenode_host = localhost
    # User may define more:
    # [[[ cluster_2 ]]]
    # namenode_host = 10.0.0.1
Your application's conf.py is special. It provides access to the configuration file (and even
default configurations not specified in the file). Using the above example, your conf.py should
define the following:
A desktop.lib.conf.Config object for app_property, such as:
MY_PROPERTY = Config(key='app_property', default='Beatles', help='blah')
You can access its value by MY_PROPERTY.get().
A desktop.lib.conf.ConfigSection object for section_a, such as:
        SECTION_A = ConfigSection(key='section_a',
                                                            help='blah',
                                                            members=dict(
                                                                AWEIGHT=Config(key='a_weight', type=int, default=0),
                                                                AHEIGHT=Config(key='a_height', type=int, default=0)))
You can access the values by SECTION_A.AWEIGHT.get().
A desktop.lib.conf.UnspecifiedConfigSection object for filesystems, such as:
        FS = UnspecifiedConfigSection(
                                                         key='filesystems',
                                                         each=ConfigSection(members=dict(
                                                                nn_host=Config(key='namenode_host', required=True))
An UnspecifiedConfigSection is useful when the children of the section are not known.
When Desktop loads your application's configuration, it binds all sub-sections. You can
access the values by:
        cluster1_val = FS['cluster_1'].nn_host.get()
        all_clusters = FS.keys()
        for cluster in all_clusters:
                val = FS[cluster].nn_host.get()
help="..." argument to all configuration related objects in
your conf.py. The examples omit some for the sake of space. But you and your
application's users can view all the configuration variables by doing:
$ env/bin/desktop config_help
Some Cloudera Desktop applications need to run separate daemon processes on the side.
For example, jobsubd is responsible for submitting Hadoop jobs (on behalf
of the user) and monitoring them. The Desktop "views" communicate with it
through Thrift and shared states in the Django database.
Suppose your application needs a helper my_daemon.py. You need to register it by:
In setup.py, add to entry_points:
        entry_points = {
            'desktop.sdk.application': 'my_app = my_app',
            'desktop.supervisor.specs': [ 'my_daemon = my_app:SUPERVISOR_SPEC' ] }
In src/my_app/__init__.py, tell Cloudera what to run by adding:
SUPERVISOR_SPEC = dict(django_command="my_daemon")
Then in src/my_app/management/commands, create __init__.py and my_daemon.py. Your
daemon program has only one requirement: it must define a class called Command that
extends django.core.management.base.BaseCommand. Please see jobsubd.py for an example.
The next time Cloudera Desktop restarts, your my_daemon will start automatically.
If your daemon program dies (exits with a non-zero exit code), Desktop will
restart it.
"Under the covers:" Threading. Desktop, by default, runs under a slightly modified CherryPy WSGI server. This server is multi-threaded, so you can use python threading support (such as it is). The "runserver_plus" version is single-threaded. If Desktop is configured (and it may be, in the future) to use mod_wsgi under Apache httpd, then there would be multiple python processes serving the backend. This means that your Django application code should avoid depending on shared process state. Instead, place the stored state in a database or run a separate server.
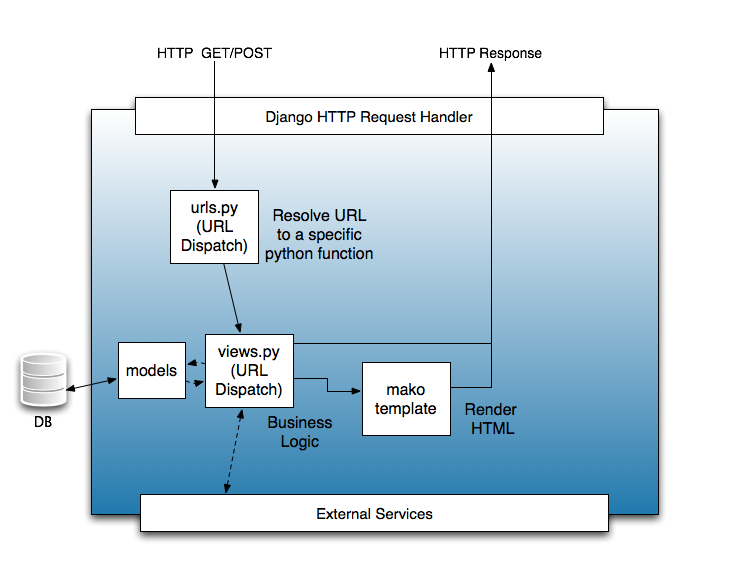
Django is an MVC framework, except that the controller is called a "view" and the "view" is called a "template". For an application developer, the essential flow to understand is how the "urls.py" file provides a mapping between URLs (expressed as a regular expression, optionally with captured parameters) and view functions. These view functions typically use their arguments (for example, the captured parameters) and their request object (which has, for example, the POST and GET parameters) to prepare dynamic content to be rendered using a template.
In Cloudera Desktop, the typical pattern for rendering data through a template is:
    from desktop.lib.django_util import render

    def view_function(request):
        return render('view_function.mako', request, dict(greeting="hello"))
The render() function chooses a template engine (either Django or Mako) based on the
extension of the template file (".html" or ".mako"). Mako templates are more powerful,
in that they allow you to run arbitrary code blocks quite easily, and are more strict (some
would say finicky); Django templates are simpler, but are less expressive.
Django Models are Django's Object-Relational Mapping framework. If your application needs to store data (history, for example), models are a good way to do it.
From an abstraction perspective, it's common to imagine external services as "models". For example, the Job Browser treats the Hadoop JobTracker as a "model", even though there's no database involved.
It is common for applications to need to access the underlying HDFS.
The request.fs object is a "file system" object that exposes
operations that manipulate HDFS. It is pre-configured to access
HDFS as the user that's currently logged in. Operations available
on request.fs are similar to the file operations typically
available in python. See hadoopfs.py for details; the list
of functions available is as follows:
chmod,
chown,exists,isdir,isfile,listdir(andlistdir_stats),mkdir,open(which exposes a file-like object withread(),write(),seek(), andtell()methods),remove,rmdir,rmtree, andstats`.
Cloudera Desktop works in any WSGI-compliant container web server.
The current recommended deployment server is the built-in CherryPy server.
The CherryPy server, which is multi-threaded, is invoked by runcpserver
and is configured to start when Desktop's supervisor script is used.
Meanwhile, runserver and runserver_plus start a single-threaded
testing server.
Because multiple threads may be accessing your views
concurrently, your views should not use shared state.
An exception is that it is acceptable to initialize
some state when the module is first imported.
If you must use shared state, use Python's threading.Lock.
Note that any module initialization may happen multiple times. Some WSGI containers (namely, Apache), will start multiple Unix processes, each with multiple threads. So, while you have to use locks to protect state within the process, there still may be multiple copies of this state.
For persistent global state, it is common to place the state in the database. If the state needs to be managed with application code, a common pattern to push state into a "helper process". For example, in the Job Designer, a helper process keeps track of the processes that have been launched. The Django views themselves are stateless, but they talk to this stateful helper process for updates. A similar approach is taken with updating metrics for the Cluster Health application.
Developing applications for Cloudera Desktop requires a minimal amount of CSS and JavaScript to use existing functionality. As covered above, creating an application for the Desktop is a matter of creating a standard HTML application that is available when you visit it in your browser (i.e. http://localhost:8000/calculator/) but also in the Desktop environment.
Our goal is to make it easy for you to author Django applications and enhance their views with default styles and behaviors provided by our SDK. If you find you want to use a UI feature that we don't have in the SDK yet, there are clear pathways for you to author that functionality using JavaScript. As time goes on and our SDK matures, you'll find more and more UI patterns present for your use.
Cloudera Desktop comes with a collection of default styles that you can use to make your apps and their UI components look like all the other apps. Your app doesn't have to use these styles, but if you do, it'll save you some time and make your app look at home on the Desktop.
You can find the default styles inside the SDK in the file located at desktop/core/static/css/shared.css.
When you create your application it will provision a CSS file for you in the static/css directory. All your styles should go here (and any images you have should go in static/art). Your app's name will be a class that is assigned to the root of your app in the DOM. So if you created an app called "calculator" then every window you create for your app will have the class "calculator". Every style you define should be prefixed with this to prevent you from accidentally polluting the styles of any other app. Examples:
/* the right way: */
.calculator p {
     /* all my paragraphs should have a margin of 8px */
    margin: 8px;
    /* and a background from my art directory */
    background: url(../art/paragraph.gif);
}
/* the wrong way: */
p {
    /* woops; we're styling all the paragraphs on the page, affecting
         every application! */
    margin: 8px;
    background: url(../art/paragraph.gif);
}
You should not use IDs in your HTML markup. This is because users can create more than one widow for your application. For instance, let's consider the File Browser. The user might launch the File Browser and view the contents of a directory where the output of a Job is being written. She may start another job and launch another File Browser to watch its output directory, too. If you use IDs in your applications you will have two elements on the page (one for each window) with the same ID. This is technically not legal HTML, but it's even worse if you start writing JavaScript and try and reference an element this way. Always use classes.
Note that the JavaScript environment (which we cover later) always provides you with a pointer for the DOM element that represents the window your app instance is in. This allows you to select all the elements in a given CSS class limited to the instance's window to prevent you from accidentally selecting elements that might have the same CSS class in another window.
You should create an icon for your application that is a transparent png sized 55px by 55px. You'll probably want to put this in the header of your application to make it easy to recognize. We'll cover that when we get to the Jframe patterns and how to add a toolbar to your application.
Cloudera desktop includes a selection of around 1,500 small 16px by 16px icons that can be useful when making links that perform actions. These are open source icons that you can use in your own applications as you like. You can find these in desktop/core/static/art/icons/ and desktop/core/static/art/led-icons/ and you can style your elements to use them like this (in your css file):
/* show an add icon next to the text of the link: */
.calculator a.add {
    background: url(/static/art/icons/add.png) no-repeat 1px 0px;
    display: block;
    height: 18px;
    padding-left: 22px;
}
/* or hide the link text and show only the icon: */
.calculator a.add {
    background: url(/static/art/icons/add.png) no-repeat 1px 0px;
    display: block;
    height: 16px;
    width: 16px
    text-indent: -200px; /* this pushes the text out of view, leaving only the icon */
    overflow: hidden;
}
By default, all windows in Cloudera Desktop have a the same basic look and feel. If you don't do anything, you'll get a window with the history component (the forward, back, and refresh buttons and the history list / current location). You can style this window to be radically different if you choose, but doing so will take some JavaScript work on your part.
Before we can change the style of our application's window, we need to change the way our application is invoked. By default, our bootstrap.js file looks like this:
CCS.Desktop.register({
    Calculator : {
        name : 'Calculator',
        css : '/calculator/static/css/calculator.css',
        require: [ /* put required js assets here    example: */ 'CCS.JBrowser' ],
        launch: function(path, options){
            // application launch code here
            // example code below:
            return new Calculator(path || '/calculator/', options);
        },
        menu: {
            id: 'ccs-calculator-menu',
            img: {
                // Replace this with a real icon!
                src: '/calculator/static/art/calculator.png'
            }
        }
    }
});
Let's walk through this line by line.
CCS.Desktop.register({
You can see we register our application with the desktop. This does several things, but principally it tells the Desktop environment that your app exists and how to invoke it as well as what dependencies it has. By default, you can see that we tell it about the following:
    Calculator : {
        name : 'calculator',
The name is declared twice. The first time you declare it it's a property of the object we pass to the register method. The name here has to be a string with no spaces or punctuation (other than underscores). Typically it's a mixed case value, but it doesn't really matter as the user never sees it. It is a key that you'll use if you do a lot of customizing and debugging though, and it also is used as the CCS class your app is given (like ".calculator").
The second line though, "name: 'app_name'" defines the value that users see. You'll probably want to customize this. For example, the app key for the file browser is "FileBrowser" but the name defined for the users is "File Browser". This name shows up, for example, when the user mouses over the icon in the dock.
css : '/calculator/static/css/calculator.css',
This is pretty straightforward. Your application has its own dedicated css file that is included. If you don't have any styles you can comment this out. You cannot include more than one css file.
require: [ /* put required js assets here example: */ 'CCS.JBrowser' ],
Here's where things get interesting. By default, our application only requires the file CCS.JBrowser.js, which gives us all our default application functionality. There's really no reason to change this unless you want to add more JavaScript functionality; we'll cover how to do that in the next section. For now, let's leave this one alone and we'll revisit it later.
launch: function(path, options){
    // application launch code here
    // example code below:
    return new Calculator(path || '/calculator/', options);
},
This defines the function that is executed when your application is launched. There are a few important requirements here:
Finally, we have the menu icon:
menu: {
    id: 'ccs-calculator-menu',
    img: {
        // Replace this with a real icon!
        src: '/calculator/static/art/calculator.png'
    }
}
This object defines the id for the menu icon (one of the few places we use ids) and then properties of the image. 'src' is the url to the icon.
It's actually not uncommon to have an application without adding it to the doc.
We'll talk a bit more about JavaScript in a bit, but one of the things the Cloudera SDK does for you is allow you to imbue your app with various UI behaviors by using pre-defined HTML markup. These patterns include things like:
Adding these kinds of things to your application require only that you use prescribed DOM structures with specific attributes. For example, let's say you wanted to have a sortable table in your response. All that you would need to do is write your template to output your table with the following HTML structure:
<table class="ccs-data_table selectable sortable" cellpadding="0" cellspacing="0">
    <thead>
        <tr>
            <th>ID</th>
            <th>TimeZone</th>
            <th>Name</th>
            <th>GEO Latitude</th>
            <th>GEO Longitude</th>
        </tr>
    </thead>
    <tbody>
        <tr>
            <td>22</td>
            <td>New York City</td>
            <td>America/New_York</td>
            <td>40.7255</td>
            <td>-73.9983</td>
        </tr>
        <tr>
            <td>23</td>
            <td>San Francisco</td>
            <td>America/Los_Angeles</td>
            <td>37.7587</td>
            <td>-122.433</td>
        </tr>
        <!-- etc -->
    </tbody>
</table>
If this were the entirety of your HTML structure, you would get a view like this:

The key to get this layout is to have a table with the CSS classes css-data_table and, optionally, adding onto that the CSS classes selectable and sortable. It's also important that your table have both thead and tbody tags.
This mechanism for inspecting the HTML response for key structures is at the heart of front-end development with the Cloudera SDK. When you want to write your own behaviors, you'll be best served to write your logic into as many of these types as patterns as possible.
There are many patterns available in the SDK for your use with more added regularly. There are so many potential patterns that there's no way we could code everything you might find yourself wanting. The Cloudera SDK provides mechanisms for you to write your own (covered below), but chances are if the pattern you are after seems commonplace but isn't yet available in our SDK, we'll add it soon. For example, as of this writing the SDK doesn't have a date chooser for form inputs. It's something we'll definitely add, but none of the apps authored thus far have required such an input. If there's a pattern that you feel is not unique to your own application, we encourage you to let us know what you need so that we can help you.
Tip: In your Desktop SDK environment there is an app called JFrame Gallery that shows all the built-in components. Here you can learn how to use all the items already present for you in the SDK.
The JavaScript class that does this HTML inspection is called CCS.JFrame (which we'll refer to from here on as just 'JFrame'). You can think of JFrame as a JavaScript implementation of an IFrame (hence its name). JFrame requests your app's home page and injects the HTML response into the body of the application window (another class called CCS.JBrowser, which we'll just call 'JBrowser'). This is roughly equivalent to opening a web browser and requesting an html document from the internet. All the links within the response will, when clicked, load their corresponding HTML into the JFrame, just as an Iframe would. The same goes for forms.
As a result, if you write your "web 1.0" application and load it into a JBrowser's JFrame, all the links and forms will work as you would expect them to.
The Cloudera SDK provides an easy way to spawn other applications from within your own. All that is required is that any link you wish have spawn another app have a target value defined for that app's name (the non-nice name, so the File Browser's app name is FileBrowser). These names aren't always obvious. The easiest way to find a manifest is to open http://localhost:8000/bootstrap.js in your browser and look at all the application registrations. For example, here's the bootstrap for the About application (which just shows you information about what version of Cloudera Desktop you are running):
/* about */
// Copyright (c) 2010, Cloudera, inc. All rights reserved.
CCS.Desktop.register({
    About : {
        name: 'About Cloudera Desktop',
        require: ['CCS.JBrowser'],
        launch: function(path, options){
            return new CCS.JBrowser('/about/', $merge({
                displayHistory: false,
                width: 350
            }, options));
        }
    }
});
In this case, the app name is "About", while the "nice" name is "About Cloudera Desktop".
If you wanted to launch this app from yours, you would just have an anchor tag with a target specified:
<a target="About">Launch the About application.</a>
Note that we didn't specify an href. This will launch the application to it's "home" page. If you want to launch an application to a specific URL, you should specify that path in the href. Be sure that you use a path that the application in question knows. For example, if you tried to launch the About app and gave it a url to the File Browser, the app will launch and display the File Browser contents but they won't be styled nor will they work.
If you specify a target for a link that does not match a known (i.e. registered) application, the link will work as normal, spawning a new window or tab in the user's web browser. You can use this if you wanted to, for example, link to some external documentation. (It's also possible for the SDK to proxy an external web service into a Desktop app, but that is not covered here.)
In addition to monitoring your links for clicks and forms for submissions (to fetch their URLs via AJAX), JFrame offers numerous other tools to help you craft your application.
Most of the tags in the HEAD of your response will be ignored. script tags (see section below on Getting Started With JavaScript), CSS link tags, and others are essentially stripped from your response. The only two tags used (currently) are the title tag and meta tag that describes a refresh duration.
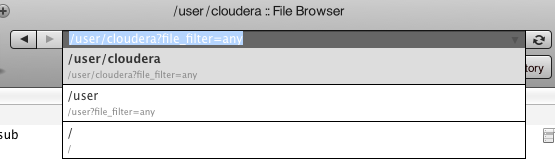
The title updates the caption area of your application window (the text at the very top) and, if you have the History component visible (which is there by default) it uses the title there. Here's what they look like:

The history component also, by default, displays the url that generated the response. This isn't always useful, and it is configurable. We'll talk about that more when we get to the JavaScript. Here's what the History location field looks like expanded:
The other tag we mentioned before was meta tags that specify a duration. These work as you'd expect, auto-refreshing your application regularly. We recommend not making this value too aggressive (every 10 seconds is fine). It also doesn't work well for some layouts that have a lot of interactive components (imagine filling out a form on a web page and the browser refreshing in the middle of it). In addition to reading this value and using it to auto-refresh, you can add to your HTML response a DOM element that will display a countdown until the next refresh (this of course is not required); just give any DOM element the CSS class sec_to_autorefresh:
<p>note: this view will auto refresh in <span class="sec_to_autorefresh"></span> seconds</p>
That element will be updated (emptied and filled) with the countdown.
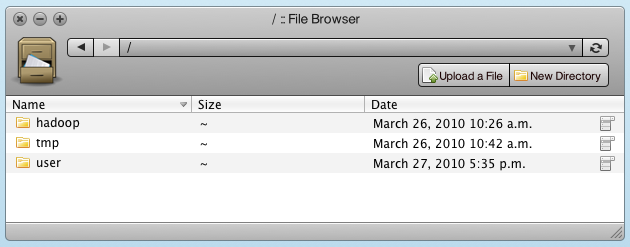
When you provision your application we automatically set it up to have the history component in the header along with your app's icon. To accommodate these things, the header area of your application is given a relatively generous amount of space that you can use to show additional elements. You might want to use the space, for example, to add buttons to do things or to navigate. If you look around Cloudera Desktop itself you'll find a lot of examples. Here's the header of the File Browser application:
The icon and history components are there, but so are buttons to upload a file or create a folder.
To get HTML into the navigation area of your application you simply give the container of that HTML a DIV with the CSS class toolbar. here's the relevant HTML of the File Browser:
<div class="toolbar">
    <a href="/filebrowser/view/"><img src="/filebrowser/static/art/icon_large.png" class="fb_icon"/></a>
    <div class="fb-actions ccs-button_bar">
        <a class="fb-upload ccs-art_button" data-icon-styles="{'width' : 16, 'height': 16}" href="/filebrowser/upload?dest=/&next=/filebrowser/view/">Upload a File</a>
        <a class="fb-mkdir ccs-art_button" data-icon-styles="{'width' : 16, 'height': 16}" href="/filebrowser/mkdir?path=/&next=/filebrowser/view/">New Directory</a>
    </div>
</div>
There are some other things going on here - the button styling is achieved by wrapping buttons in the ccs-button_bar CSS class and the buttons themselves are styled with more CSS properties and even some custom values for the icon styles (the little images in the button next to the text). Let's gloss over these for now and just focus on the toolbar aspect itself.
When JFrame retrieves your HTML from the server it looks in the response for any of these toolbar elements and when it finds them it moves them into the header. Every time JFrame loads a new page the header is emptied and filled anew. Thus if you want your icon to always be present, you need to have it in every response. In this case, we've also wrapped it in a link to go to the root view of the File Browser app, which makes it act something like a "home" button.
Important Items in the Toolbar must be positioned absolutely. You can't push them around with margins or top and left values with the element positioned relative. If you don't use position: absolute; your element will overlay the close/minimize/maximize buttons and maybe even the history bar.
You can have as many of these toolbar elements as you like in your response; they'll all get injected into the header.
It's also worth noting that the size of the header - its height - is controlled in a JavaScript declaration using ART.Sheet. We'll cover how to change this, as well as how to style other things that are being rendered by JavaScript, when we touch on ART.Sheet below.
You can think of JFrame as being the portion of your application window between the header and the footer. In this image it's the white area with the folder list below the grey header and the grey footer:
If you were to wrap your HTML response in a DIV and give it a CSS class that was different for each view of your application with the purpose of styling it, you'd discover that you wouldn't be able to style the content that got moved into the header of the application window. This is because the JavaScript class that manages that window (JBrowser) is the thing that actually moves content out of JFrame and into its header (a JBrowser has a JFrame, but JFrame doesn't have any real knowledge that it's in a JBrowser).
So if you want to style your header or any of your other content depending on which view of your application is displayed you instead define that view by wrapping your response with a special DIV. This DIV is given the CSS class view and is a root level node (i.e. its direct parent is the BODY tag). You can give it additional classes if you want to, but these will only wrap the content area when it is displayed. In addition to the view CSS class, you assign this DIV an ID - one of the very few places where it's ok to use IDs. When such a response comes back, JFrame finds it and passes along the value assigned to the ID of this element as the "view" and removes the ID attribute from the DOM element. When JFrame renders your response, this ID will not be present.
Instead, JBrowser takes this ID and assigns it as a class name to the element that contains both the header and the body of your application. In this manner you can have styles that will affect both your header and body, despite the fact that these are split apart.
Here's what that HTML might look like:
<div id="some_view_name" class="view">
    <!-- the rest of your HTML -->
</div>
JFrame will remove this id from the element before rendering it, and take the value of the ID property and assign it as a class to the DIV that contains the application. Thus, the DIV above would allow for the following CSS style:
.calculator .some_view_name div.foo p b etc... {
    ..some styles
}
This "view" value is also passed to you in your JavaScript, allowing you to define custom behaviors depending on which screen is displayed.
So let's say you want to customize your application. You might want to add some JavaScript to let the user interact with your application in some esoteric fashion that the SDK doesn't provide. This might be a drag and drop feature or maybe an image gallery. As mentioned previously, the web 1.0 applications do not have JavaScript. If you put a JavaScript tag in your content, the Desktop application will not execute it.
Why do we do this? Because Cloudera Desktop applications don't have a scope when their HTML is evaluated. They can't; their scope is shared with the entire Desktop. The way we limit the scope of functionality is to provide callbacks when your Application renders a view so that you can define custom behavior without affecting other windows on the page.
At this point it's worth noting that Cloudera uses the Mootools JavaScript framework for all its client side development. Cloudera Desktop uses the following libraries:
If you're going to dive into JavaScript, you'll want to familiarize yourself with the MooTools Core (docs, tutorial) and maybe the MooTools More and Clientcide libraries. MooTools ART is what does all the button and window rendering, but it's still undocumented. We'll try and cover the basics of what you'll need to know about that library later on in this walk-through.
The default boostrap for your application invokes your app like this:
return new Calculator(path || '/calculator/', options);
To customize your application, we need to extend the CCS.JBrowser class to create our own custom implementation. When you provision your application, we will already have an extension defined for you.
Inside your application you'll find a JavaScript directory already provisioned for you in /static/js/. In that directory you'll find a file called package.yml. This file is a manifest of the contents your application's JavaScript. By default it points to a single JavaScript source file in Source/YourAppName.js. If you add more JavaScript source files, be sure to update the package.yml file so that Desktop can properly load your JavaScript. Whenever you change the JavaScript dependencies for your application, you need to restart the Django server unless you have an environment variable set to have it run in "live" mode (see note below on Debugging Tips and Tricks).
Any JavaScript you write will either be a dependency of another JavaScript file or depend on another JavaScript file (often both). Cloudera calculates JS dependencies on the fly using a combination of YAML manifest files and YAML headers in our JavaScript files. Briefly, here's what they look like.
The YAML manifest file lists the names of all the files in a package, the package's name, and some metadata. here's a sample:
copyright: 2010
description: Shared components for Cloudera Desktop
name: ccs-shared
sources: [Source/Path/To/A/JS/File.js, Source/Path/To/Another/JS/File.js, etc]
version: 0.4.0
The values here are pretty straightforward. The most important ones are the name, which other scripts will refer to, and the list of sources (an array of paths to the various JavaScript files in this package).
To understand the JavaScript file headers, let's look at the one we created for our Calculator application:
/*
---

script: Calculator.js

description: Defines Calculator; a Cloudera Desktop application that extends CCS.JBrowser.

license: MIT-style license

authors:
- Unknown

requires:
- ccs-shared/CCS.JBrowser

provides: [Calculator]

...
*/
This is the beginning of our application's JavaScript. It is a YAML fragment that is wrapped with "---" and ends with "...". We parse this information out to make our dependency graph. The values defined are as follows:
CCS.JBrowser source from the ccs-shared package.Note that class dependencies cascade; by requiring CCS.JBrowser you get all of its dependencies. If, for example, you needed something out of MooTools Core, you'd look in it's package.yaml (at ext/mootools-core/package.yaml) to see its manifest and its name (core) and then look in any file for what it provides. The same is true of all the other packages in desktop.
Perhaps a simpler method is to drop to your shell and execute the following:
$ env/bin/desktop depender_check
This command is useful in two ways: first, it will list all the files available to the Desktop and secondly it will validate that all the files required are found and that there are no circular references. So if we wanted to require, say, Swiff.js from MooTools Core, we could alter our script header thusly:
requires:
- ccs-shared/CCS.JBrowser
- core/Swiff
CCS.JBrowser is an extension of a MooTools plugin called ART.Browser found in the MooTools ART library, specifically in its widgets collection. You can see the version of this running in Cloudera Desktop at http://github.com/cloudera/art-widgets/. This codebase is still in beta and is light on documentation. That's ok, we'll try and tell you what you need to know here.
The most important thing to know about styling ART.Window is how ART.Sheet works. Every component in ART has a CSS selector applied to it, and its styles are derived from values assigned to ART.Sheet. Let's look at the default styles that come with ART.Browser.
ART.Sheet.defineStyle('window.browser', {
    'header-height': 60,
    'header-overflow': 'visible'
});

ART.Sheet.defineStyle('history.browser', {
    'top':30,
    'padding': '0 8px 0 10px'
});

ART.Sheet.defineStyle('history input', {
    'left': 66
});

ART.Sheet.defineStyle('history input.disabled', {
    'left': 66
});

ART.Browser = new Class({

    Extends: ART.Window,

    options: {
        className: 'browser',
        historyOptions: {...}
        etc...
    },

    etc...
As you can see, ART.Browser extends ART.Window, meaning that it inherits all the properties of that parent class. It defines in is options a "className" value of "browser". In the first lines, you'll see that it defines styles for the height of the header of 60px by using the selector "window.browser". Each ART component has a fixed set of styles that are valid and they all cascade. If you look at ART.Window you'll find many, many more styles.
The only things that really interest us for the purpose of this demo are the styles necessary to put our logo in the header of our application. Let's look at the header of our Calculator JavaScript:
ART.Sheet.defineStyle('window.browser.calculator', {
    'header-height': 90,
    'header-overflow': 'visible',
    'min-width': 620
});

ART.Sheet.defineStyle('window.browser.calculator history.browser', {
    'top':32,
    'padding': '0 8px 0 60px'
});

ART.Sheet.defineStyle('window.browser.calculator history input', {
    'left': 66
});

ART.Sheet.defineStyle('window.browser.calculator history input.disabled', {
    'left': 66
});

var Calculator = new Class({

    Extends: CCS.JBrowser,

    options: {
        className: 'browser calculator'
    },

    etc
In the code above, we set the className value to both 'browser' and 'calculator', which allows us to define custom styles for our application. In this case, we define a taller header height and we style the history component to be shorter on the left to make room for our logo.
To put the logo in the header, as well as, perhaps, other things like toolbar buttons or form filters, we'll need to send them to our window in our AJAX response. See the previous section on "Putting Elements into the Navigation Bar".
In the previous section we touched on CCS.JBrowser, which is the JavaScript class that generates an application window in Cloudera Desktop. This window is empty - just a header, a footer, a content area, and an optional history navigation. To load content into it, every instance of CCS.JBrowser has an instance of another class called CCS.JFrame (which we discussed earlier).
To customize your application you'll need to add new code to your extension of JBrowser to do additional things when that instance's JFrame changes state.
If you want to define JavaScript that your application uses you can't just write a script tag in your HTML response. As mentioned before, we need to contain the scope of the code we run for each window. Instead, you write code where you define your Class, as each window of your application will have its own instance of your class.
Let's say whenever your application loads you wanted to alert the user (which would be annoying, but it will illustrate the point). We'd pick up with our class's definition from the previous example and write some code in its initialize method, which is invoked every time our application is instantiated.
var Calculator = new Class({

    Extends: CCS.JBrowser,

    options: {
        className: 'browser calculator'
    },

    //your app will possibly be passed two arguments, a path, and an object called options
    initialize: function(path, options) {
        //this.parent calls this initialize method on the superclass, in this case, CCS.JBrowser
        //note that if the path isn't specified, we have a default path, /calculator/
        this.parent(path || '/calculator/', options);

        //now let's customize our application. We'll add an event listener for JBrowser's custom 'load' event
        this.addEvent('load', function(){
            alert('I just loaded this url: ' + this.currentPath);
        }.bind(this)); //don't forget to bind your function to this instance (see below)
    },

    etc
In the example above we have a standard CCS.JBrowser extension. It states that it extends CCS.JBrowser, defines a custom className for itself and has an initialize method that invokes the initialize method of CCS.JBrowser using the this.parent method. Then we customize the behavior, adding an function callback to the load event. Because our function references a property of our JBrowser instance, we need to bind "this" to our function. We then reference a JFrame property for the current url that's loaded.
There are a lot of other tools that JFrame and JBrowser provide that allow you to customize your application. Many of them don't require you to write any JavaScript at all.
As covered earlier on the section about views, if you wrap your response in a DIV with the CSS class view and an ID that references the current display, this value will removed from the DOM element and added as a CSS class value to the container that wraps both the content area and the header. Here's an HTML example to refresh your memory:
<div id="some_view_name" class="view">
    <!-- the rest of your HTML -->
</div>
This "view" value is also used when you want to write custom JavaScript for a specific view. For example, let's say you want to write some JavaScript to alert the user whenever they click an image on your "gallery" view. In your application's JavaScript, you would write this (here we're going to use some MooTools JavaScript):
var Calculator = new Class({

    //...excluding some lines from our earlier example

    initialize: function(path, options) {
        this.parent(path || '/calculator/', options);

        //when JFrame loads, call our setup method - don't forget to bind!
        this.addEvent('load', this.setup.bind(this));
    },

    //the load event in JFrame invokes our callback and passes it the view
    setup: function(view) {
        //detect our view - did we wrap our response in a <div class="view" id="gallery"> ?
        if (view == 'gallery') {
            //see note below on "$(this)"
            //get all the image elements within this window with the class "thumbnail"
            //and iterate over them with the .each Array method
            $(this).getElements('img.thumbnail').each(function(image){
                //attach a click event to each image found
                image.addEvent('click', function(){
                    alert('you clicked an image!');
                }); //we don't need to bind(this) because we don't refer to 'this' anywhere in our click handler
            });
        }
    },

    etc
Let's digest this a bit. First, there's a bit of magic going on with the $(this) statement. This is MooTools providing us a mechanism to get to the element that our Class is represented by. In this case, when we invoke $(this) we get a pointer to the DOM element containing the window of our app. From this point, we can execute a selector method to get elements only within our window. Thus $(this).getElements('img.thumbnail') won't return images with a 'thumbnail' CSS class in some other window, but rather only in the one our instance is bound to. The rest of the code is fairly straight forward. You should refer to the MooTools documentation and tutorial for more examples.
As a side note, our click event handler above would benefit greatly from event delegation. We'll touch on this later when we discuss another bit of JFrame magic: linkers.
In your extension of JBrowser you can easily attach event logic to when new content loads as illustrated in the previous example. JBrowser also inherits the following events from its ancestor classes in the ART collection of classes:
true if the content is hidden (and dragging has begun) or false if the content has been restored.In addition to these events, every instance of JBrowser has a pointer to its JFrame (as this.jframe). JFrame provides the following events:
You can attach logic to any of the events above, but it's highly unlikely that you'll need to use any other than the load event on JBrowser. Most of the time though you'll be better off using JFrame renderers, linkers, and filters.
JFrame has several phases it goes through in the process of requesting new HTML from the server. Some of these are event callbacks that I mentioned earlier, but others are phases that apply behavior to the HTML response based on what that response contains. You've already seen functionality that allows you to attach events, and in the previous section where we demonstrated how to add a sortable table by only adding a CSS class you got a glimpse of how JFrame adds a bit of magic to your otherwise regular HTML.
This magic is spit up into three distinct methodologies we call Renderers, Filters, and Linkers.
Renderers are what they sound like; they are code that take the HTML returned by the server and parse and process it into the output you see displayed in the window. The default renderer performs the following actions:
this.currentPathscript, meta, link and other tags as well as the html, head, and body tags from the responseIt's unlikely that you'll write your own, so we'll not cover how to do that in this tutorial, but it's useful to know what's going on. In the SDK we only have two other renderers; Alert and Prompt. These are their own renderers because they don't do the things listed above. The alert renderer, for example, displays an alert above the previous content and when the user dismisses it they are looking at the previous state. The prompt renderer is similar, except that the "Cancel" button restores the previous state, while the "Ok" button submits the form in the prompt and loads a new page (using the default renderer).
If renderers are on the front end of the load process - the thing that handles the HTML response itself - then Linkers are on the end. Linkers are functions assigned to CSS classes that are matched against any anchor tag that is clicked. For example, let's say we wanted to show an alert whenever you clicked on an anchor with the CSS class alert. We could define a linker on our instance's version of JFrame that looked like this:
var Calculator = new Class({

    //...excluding some lines from our earlier example

    initialize: function(path, options) {
        this.parent(path || '/calculator/', options);

        this.jframe.addLinker('a.foo', function(theClickEvent, theLinkElementClicked){
            alert('you clicked a foo link!');
        });
    },

    etc...
JFrame already intercepts all the clicks to links in your document. By default, it loads the content of those links into the content area unless they have a location reference on the page (href="#name") - in which case it scrolls the window to the element in question - or if there is a target attribute specified (this is covered in the "Launching Other Desktop Applications" section).
With linkers, you can easily override what an anchor would normally do. If the CSS selector matches the link the user clicked, the default linker (described in the previous paragraph) will not handle that event and instead defer to your function. Your function is passed two arguments: the event object (see the MooTools documentation for its properties and methods) and the element that was clicked (see the MooTools documentation for Elements). With these two references you can define any behavior you like. Be sure to cancel the default behavior of the event object (theClickEvent.preventDefault();) or else the browser will leave the desktop.
Note that when you add such linkers they persist. You shouldn't add them more than once (e.g. don't add them in the onLoad event). Typically they are added in the initialize method of your class.
If renderers are at the beginning of the handling of HTML responses, and linkers are kind of at the end (in that they typically handle the user clicking to load new content, though not always), filters are kind of in the middle. Filters snoop through the content of the response and look for patterns in the HTML that match their requirements. The sortable table example from the "Adding Interactive Elements to Your UI" section is a great example of this. Let's look at another one to see how these work. Here's the JFrame filter from the Cloudera SDK for a tabbed UI. To illustrate this, I'll provide the HTML, JavaScript, and a screenshot of what it looks like; here's the screenshot:
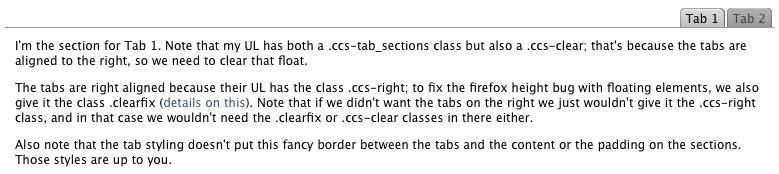
And here's the html that produces it (this is the entire template that generated that screenshot):
<!DOCTYPE html PUBLIC "-//W3C//DTD HTML 4.01//EN">
<html>
    <head>
        <title>Tabs</title>
    </head>
    <body>
        <div class="jframe_padded">
            <div class="ccs-tab_ui">
                <ul class="ccs-tabs ccs-right clearfix">
                    <li><span>Tab 1</span></li>
                    <li><span>Tab 2</span></li>
                </ul>
            </div>
            <ul class="ccs-tab_sections ccs-clear" style="border-top: 1px solid #999; padding: 10px">
                <li>
                    <p>I'm the section for Tab 1. Note that my UL has both a .ccs-tab_sections class but also a .ccs-clear; that's because the tabs are aligned to the right, so we need to clear that float.</p>
                    <p>
                        (cropping out the rest of the text for space)
                    </p>
                </li>
                <li>
                    <p>I'm the section for Tab 2. Notice how, since this section is much longer, I resize gracefully when I display and hide. Here's a paragraph or two of Lorem Ipsum just to make this section longer.</p>
                    <p>(cropping out the rest of the text for space)</p>
                </li>
            </ul>
        </div>
    </body>
</html>
And here's the Javascript that adds that filter:
CCS.JFrame.addGlobalFilters({

    tabs: function(container) {
        if (!container.get('html').test('ccs-tab_ui')) return;
        container.getElements('.ccs-tab_ui').each(function(tabGroup){
            var tabs = tabGroup.getElements('.ccs-tabs>li');
            var sections = tabGroup.getElements('.ccs-tab_sections>li');
            if (tabs.length != sections.length) {
                dbug.warn('warning; sections and sections are not of equal number. tabs: %o, sections: %o', tabs, sections);
                return;
            }
            var ts = new TabSwapper({
                tabs: tabs,
                sections: sections,
                smooth: true,
                smoothSize: true
            });
            tabGroup.store('TabSwapper', ts);
        }, this);
    }

});
There are a few interesting things going on here. Let's walk through the JavaScript.
CCS.JFrame.addGlobalFilters({
  tabs: function(container) {
Here we're adding a global filter that affects all JFrames. You should probably only add filters to your own application(s) (many of our own applications add their own locally in the same manner). The SDK adds some global ones for all applications. The name isn't really that important; it's mostly used for providing useful debugging when there's an error (so we can log which filter failed).
if (!container.get('html').test('ccs-tab_ui')) return;
In the code above we check to see if our HTML contains a string match. We could try and select any elements that match the selector, but this is more expensive. Doing a quick string check allows us to exit quickly if there is no match.
In this next section we find the containers of each of the tab components, loop through them and find the tabs themselves, and the corresponding sections that the tabs are supposed to show.
    container.getElements('.ccs-tab_ui').each(function(tabGroup){
        var tabs = tabGroup.getElements('.ccs-tabs>li');
        var sections = tabGroup.getElements('.ccs-tab_sections>li');
If the tabs and the sections they are supposed to show don't match in count, something is probably wrong. We throw a warning to the console (via the dbug wrapper). This won't show up to the user, but if we enable the debugger, we'll see the complaint. In this case, our HTML should degrade; the UI may look ugly, but all the HTML will be visible.
        if (tabs.length != sections.length) {
            dbug.warn('warning; sections and sections are not of equal number. tabs: %o, sections: %o', tabs, sections);
            return;
        }
We create an instance of our JavaScript class that handles tabs - TabSwapper.
        var ts = new TabSwapper({
            tabs: tabs,
            sections: sections,
            smooth: true,
            smoothSize: true
        });
The last thing we do (and this isn't a requirement) is store a reference to the instance of the TabSwapper on the wrapper element.
        tabGroup.store('TabSwapper', ts);
    }, this);
This storage of the instance on the element it enhances is really just there convenience. Actually, most MooTools classes do this for you (TabSwapper doesn't because it takes as arguments the tabs and sections, not the container, so there is no one element that it is bound to, unlike our pattern here were we have a wrapper). By storing this reference, we can retrieve it in our own application code ($(this).getElement('.ccs-tab_ui').retrieve('TabSwapper')) and call its methods.
Now whenever our JFrame receives an HTML response it will grep the response and, if it finds our marker, apply this pattern. In this way, we imbue the HTML response with functionality. Our application code needs only to format its HTML in this predefined way. This makes the code highly reusable; future applications that you write don't need to repeat this programming effort; they need only implement this filter.
Declaring keyboard shortcuts for your application is fairly easy, though it is possible to come up with complexities of course. First, you'll want to review the documentation for Keyboard and Keyboard.Extras. In general, you'll want to define hot-keys with the addShortcut method which allows you to add metadata like a description and a custom string for the keys to press. This is added to the list of shortcuts when the user clicks the "shortcuts" button in the Desktop (or uses the hot-key to show them - ctrl+?). Note that your hot-keys are only in effect when your application is in focus.
Here's a quick example of a hot-key in Cloudera Desktop - in this case, from the File Browser:
this.jframe.addShortcuts({
    'Open Selected': {
        keys: 'enter',
        shortcut: 'enter',
        handler: function(e){
            //get the file list table
            var table = $(this).getElement('.ccs-data_table');
            if (!table) return;
            //retrieve its instance of the HtmlTable class
            hTable = table.retrieve('HtmlTable');
            //get it the selected element
            var selected = hTable.selectedRows[0];
            if (!selected) return;
            //load the content as if the user clicked on the link inside it
            this.jframe.load(selected.getElement('.fb-item').get('href'));
        }.bind(this),
        description: 'Open the selected item.'
    }
});
You can add as many as you like, but be cautious of how certain keys can affect different browsers in different operating systems.
Cloudera Desktop provides a simple way for you to display temporary messages to the viewer. You simply invoke the following JavaScript:
CCS.Desktop.flashMessage(messages, duration);
The messages argument can be a single message (a string) or an array of strings. The duration is an integer representing the number of milliseconds to wait before hiding it. It defaults to 4.5 seconds.
In addition to this client-side method, there's also a way to set flash
messages in Django. Use request.flash.put("your message") in your
view.
When you write functionality for your application there are times where you may need to manually collect some garbage. If you attach event listeners to the content of your application MooTools (and the browser) will collect this for you. Likewise, if you create an instance of a class this too will be cleaned up. But it is possible you might create a relationship beyond these things that you wish to undo. For example, let's say you use Event Delegation to add an event to the JFrame container for a specific view. Let's say you want to capture the right-click event on any image. This falls outside of the Linkers pattern that JFrame uses (which monitors links for regular clicks). So in your "gallery" view you want this right click monitor, but not in others. Here's how we would add the watcher:
var Calculator = new Class({

    //...excluding some lines from our earlier example

    initialize: function(path, options) {
        this.parent(path || '/calculator/', options);
        this.addEvent('load', this.setup.bind(this));
    },

    setup: function(view) {
        if (view == 'gallery') {
            //$(this.jframe) gives us a pointer to the content area of the window
            $(this.jframe).addEvent('contextmenu:img', function(event, imageClicked){
                alert("you can't right these!");
                event.stop();
            });
        }
    },

    etc.
Ok, you've now added this event, but there are two problems. First, we're going to add this event every time the page loads, which means that we'll end up showing many alerts when the user right clicks (one for every time the page loaded). The second issue is that this event will be attached when the user visits a gallery page, but will stay in effect on non-gallery pages. We need some way to clean up this reference.
To remove this event, we pass a function that does our clean up to the markForCleanup function for JFrame. Functions passed here are run when JFrame removes the old content and gets ready to add new content, and they are only run once. To fix the problems above, we'd change our setup method to look like this:
setup: function(view) {
    if (view == 'gallery') {
        //we have to store a pointer to the function we are going to use
        var alertMsg = function(event, imageClicked){
            alert("you can't right these!");
            event.stop();
        };
        $(this.jframe).addEvent('contextmenu:img', alertMsg);
        this.markForCleanup(function(){
            $(this.jframe).removeEvent('contextmenu:img', alertMsg)
        }.bind(this)); //we reference "this" inside, so we must bind it
    }
},
Now the event will be added when the application loads the "gallery" view, and when that page is cleaned up in preparation for the new page, our cleanup function will be run (once). If we load another gallery page, we'll again add our right click monitor, and again we'll add our cleanup method.
Most of the time you don't need to do this, but it does come up. When in doubt, add a method that undoes whatever you create. It never hurts.
It is possible to include other JavaScript frameworks to do your development. You'll still need to write a minimum of MooTools style JavaScript to set up your extension of JBrowser, but after that you can do what you like. To do this you'll need to configure a version of that library to work with our dependency system and then require those files in your application's header. The only known restraint is that you cannot include another JavaScript library that alters native JavaScript prototypes (Prototype.js being the only real known conflict). jQuery, Dojo, YUI, etc are all fine. Including them represents an additional burden for your users to download, and they also make it harder for us to support you, but its your call.
The status bar at the bottom of the screen is pluggable. Use "desktop.views.register_status_bar_view" to register a view of your application into the global status bar. If this view is registered, then it will be called with a request, and its content will be concatenated with all other similarly-registered views.
__import__("ipdb").set_trace()
into your code. If you want to inspect variables, you can simply insert raise None, and visit the
URL of the view you're interested in, activating the Werkzeug debugger.If you find yourself writing a lot of JavaScript, you'll want to disable the JavaScript caching that the server does. At startup Cloudera Desktop reads all your dependencies and JS files into memory to make things faster. You can disable this by executing the runserver_plus command with an environment variable set. Desktop will be a little slower, but your JS will always represent what's on the disk. Here's what that looks like:
`$ DESKTOP_DEPENDER_DEBUG=1 env/bin/desktop runserver_plus`
We highly recommend developing with the Firebug debugging plugin for Firefox. With it enabled, you can use a utility called dbug which wraps Firebug commands. This allows you to leave debug statements in your code and display them on demand. In particular, typing in dbug.cookie() in Firebug will set a cookie in your browser that will turn these statements on until you type that command again to toggle them off. You'll see some of our own debugging statements and you can add your own. In the future, entering this state may also provide access to additional debugging features.