Table of Contents
Cloudera Desktop is a graphical user interface to operate and develop for Hadoop. Cloudera Desktop "applications" are collected into a desktop environment and delivered as a Web application, requiring no additional installation for individual users'. With Cloudera Desktop, the world-class performance and scalability of Apache Hadoop is now accessible to anyone in your organization.
This document will you install and configure Cloudera Desktop.
To use Cloudera Desktop, you’ll need to install both Cloudera’s Distribution of Hadoop (we recommend CDH2, the latest stable version as of March 2010), and Cloudera Desktop itself.
If you’re just experimenting, we recommend running everything on one machine; this is called a "pseudo-distributed cluster". The QuickStart instructions will guide you there. For installation on your production cluster, you’ll need the Complete Instructions.
If you just want to get started as quickly as possible, these instructions instructions describe how to install Cloudera Desktop on one machine, a so-called "pseudo-distributed cluster". If you already have an existing multi-node cluster running, skip ahead to Complete Instructions.
Note:
-
All commands that need to be run as
roothave a#command prompt. -
All commands that do not require
roothave a$command prompt.
![[Tip]](images/tip.png) | What is pseudo-distributed mode? |
|---|---|
"Pseudo-distributed mode" refers to an installation of Hadoop that contains all of the same pieces as a real production Hadoop cluster, just running on a single node. This mode is ideal if you’re just learning about Hadoop before you go on to set up a multinode cluster. |
In order to install Cloudera Desktop and Hadoop in pseudo-distributed mode, you’ll need to add Cloudera’s Desktop’s apt or yum
repository to your package manager’s configuration.
If you are running on a Redhat-based system, you can easily download our
software using yum. You can also just download the RPMs directly from
-
Add the Yum repository. Download the cloudera-desktop.repo file and copy it into your
/etc/yum.repos.d/directory.
After you’ve set up the Cloudera rpm repository, you can install the hadoop-0.20-conf-pseudo-desktop package to automatically set up Desktop on a new pseudo-distributed Hadoop cluster:
# yum install hadoop-0.20-conf-pseudo-desktop
On 64-bit machines, please run:
# yum install hadoop-0.20-conf-pseudo-desktop cloudera-desktop.x86_64
If you are running on a Debian-based platform, you can download our packages using apt.
-
Add repository. Create a new file
/etc/apt/sources.list.d/cloudera.listwith the following contents, taking care to replace DISTRO with the name of your distribution (find out by runninglsb_release -c)
deb http://desktop:tabletop@archive.cloudera.com/desktop-0.4/debian DISTRO-testing contrib
deb-src http://desktop:tabletop@archive.cloudera.com/desktop-0.4/debian DISTRO-testing contrib
- Add repository key. (optional) Add the Cloudera Public GPG Key to your repository by executing the following command:
# curl -s http://archive.cloudera.com/debian/archive.key | apt-key add -
This allows you to verify that you are downloading genuine packages.
- Update APT package index. Simply run:
# apt-get update
-
Install the Hadoop Pseudo Distributed Package. After you’ve set up the Cloudera
aptrepository, you can install thehadoop-0.20-conf-pseudo-desktoppackage to automatically set up Desktop on a new pseudo-distributed Hadoop cluster:
# apt-get install hadoop-0.20-conf-pseudo-desktop
At this point, you should have Hadoop installed and configured for pseudo-distributed operation. To start your cluster, run the following commands:
# /etc/init.d/hadoop-0.20-namenode start
# /etc/init.d/hadoop-0.20-datanode start
# /etc/init.d/hadoop-0.20-secondarynamenode start
# /etc/init.d/hadoop-0.20-jobtracker start
# /etc/init.d/hadoop-0.20-tasktracker start
To verify that your cluster is running, visit http://localhost:50030/ in
your web browser. You should see the Hadoop JobTracker Web Interface. To
verify that the namenode is running, visit http://localhost:50070/.
Additionally, you can now run a simple example job to verify that your cluster can execute MapReduce jobs:
$ hadoop-0.20 jar /usr/lib/hadoop-0.20/hadoop*examples*jar pi 2 10000
After a minute or so, this example job should print out a very rough approximation of the value of Pi.
Finally, start up the Cloudera Desktop server:
# /etc/init.d/cloudera-desktop start
Cloudera Desktop should have started at http://localhost:8088/.
At this point, skip ahead to Using Cloudera Desktop.
These instructions will guide you through installing Cloudera Desktop on a multi-node cluster. You will need to update some Hadoop configuration as well as install Cloudera Desktop.
![[Important]](images/important.png) | |
You’ll need to install the Cloudera Desktop Plug-ins on every machine that’s running Hadoop daemons. |
Cloudera Desktop requires an installation of the Cloudera Distribution of Hadoop (version 2). See link:http://archive.cloudera.com/ for instructions.
To use Cloudera Desktop, you must be running Cloudera’s Distribution for Hadoop
with a version number of at least 0.20.1+133. If you are not running at least this
version of Hadoop, please upgrade your cluster before proceeding.
Cloudera Desktop consists of a web service that runs on a special node in your cluster. You should pick one node to run Cloudera Desktop. From this point on, we’ll refer to that node as the "Cloudera Desktop Server". This should be one of the nodes within your cluster for optimal performance, though it can be a remote node as long as there are no overly restrictive firewalls.
For small clusters of less than 10 nodes, it is fine to choose your existing master node as the Cloudera Desktop Server.
You can install Cloudera Desktop via package repositories (yum or apt) or by using a tarball.
If you are running on a Redhat-based system, you can easily download our
software using yum. You can also just download the RPMs directly from
-
Add the Yum repository. Download the cloudera-desktop.repo file and copy it into your
/etc/yum.repos.d/directory. - Find and install packages. For example:
# yum search hadoop
# yum install cloudera-desktop
On your Cloudera Desktop Server, run:
# yum install cloudera-desktop
If your server is running a 64-bit Linux, instead run:
# yum install cloudera-desktop.x86_64
On every node in your cluster that is running Hadoop daemons, run:
# yum install cloudera-desktop-plugins
If you are running on a Debian-based platform, you can download our packages using apt.
-
Add repository. Create a new file
/etc/apt/sources.list.d/cloudera-desktop.listwith the following contents, taking care to replace DISTRO with the name of your distribution (find out by runninglsb_release -c)
deb http://desktop:tabletop@archive.cloudera.com/desktop-0.4/debian DISTRO-testing contrib
deb-src http://desktop:tabletop@archive.cloudera.com/desktop-0.4/debian DISTRO-testing contrib
- Add repository key. (optional) Add the Cloudera Public GPG Key to your repository by executing the following command:
# curl -s http://archive.cloudera.com/debian/archive.key | apt-key add -
This allows you to verify that you are downloading genuine packages.
- Update APT package index. Simply run:
# apt-get update
- Find and install packages. You may now find and install packages from the Cloudera repository using your favorite APT package manager (e.g apt-get, aptitude, or dselect). For example:
# apt-cache search cloudera-desktop
On your Cloudera Desktop Server, run:
# apt-get install cloudera-desktop
On every node in your cluster that is running Hadoop daemons, run:
# apt-get install cloudera-desktop-plugins
You can also install Cloudera Desktop via a tarball.
Cloudera Desktop employs some Python modules which use native code and depend on certain development libraries being on your system. To install from the tarball you must have the following installed:
Table 1. Required Dependencies
| Redhat | Debian |
|---|---|
| libxslt-devel | libxslt-dev |
| libxml2-devel | libxml2-dev |
| sqlite-devel | libsqlite3-dev |
| python-devel | python2.4-dev(orpython2.5-dev) |
| gcc | gcc |
| python-setuptools | python-setuptools |
Additionally, you must have Cloudera’s Distribution for Hadoop installed and available. Specifically, your Hadoop version must be at least 0.20.1+133. If you have a previous release, upgrade Hadoop before continuing with Cloudera Desktop.
With $HADOOP_HOME and $PREFIX configured to the path of your Hadoop
installation and the path where you’d like to install Cloudera Desktop,
respectively, run:
$ HADOOP_HOME=/path/to/hadoop-0.20.1+152 PREFIX=/path/to/install/into make desktop install
You may install Cloudera Desktop anywhere on your system - it does not need root access. We recommend that you create a new user for Cloudera Desktop and either install in that user’s home directory or in a directory within /usr/local.
In order to communicate with Hadoop, Cloudera Desktop requires that you install and configure a plugin JAR. This jar is libs/hadoop/java-lib/cloudera-desktop-plugins-0.4.1.jar.
Symlink this jar into your Hadoop lib directory (/usr/lib/hadoop-0.20/lib if you’ve installed CDH via a Debian or RPM package):
$ cd /usr/lib/hadoop-0.20/lib
$ ln -s /usr/local/cloudera-desktop/libs/hadoop/java-lib/cloudera*jar
# Restart Hadoop
![[Note]](images/note.png) | |
On a multi-node cluster, you will need to install the plug-ins on every node. You do not need to install the entirety of Cloudera Desktop everywhere, but the plug-in jars need to be available on every machine. |
Once you have made these changes in your Hadoop configuration, go ahead and restart your Hadoop daemons.
To start Cloudera Desktop, you’ll use env/bin/supervisor. This will start
several subprocesses, corresponding to different bits of Cloudera Desktop.
I moved my Cloudera Desktop installation from one directory to another and it no longer. functions correctly.
Due to the use of absolute paths by some python packages, you’ll have to run a series of commands if you relocate your Cloudera Desktop installation. From within the new location, run:
$ make desktop
This should solve the problem.
Why does "make install" compile all of these other pieces of software? In order to ensure that Cloudera Desktop is stable on a variety of distributions and architectures, it installs a Python "virtual environment" which includes its dependencies. This ensures that the software can depend against specific versions of various Python libraries and not have to worry about what might or might not be installed already on your particular system.
Cloudera Desktop requires that you install and configure some plugins in your Hadoop installation.
When you installed the cloudera-desktop-plugins package above, your package manager
automatically added the required plugin jar
to your Hadoop installation’s lib directory, making them available to Hadoop.
In order to enable the plugins, you’ll need to make some small additions to your
configuration.
These configuration changes should be made on each node in your cluster by editing the files
in /etc/hadoop-0.20/conf/
You’ll want to add the following configuration options to hdfs-site.xml.
<property>
  <name>dfs.namenode.plugins</name>
  <value>org.apache.hadoop.thriftfs.NamenodePlugin</value>
  <description>Comma-separated list of namenode plug-ins to be activated.
  </description>
</property>
<property>
  <name>dfs.datanode.plugins</name>
  <value>org.apache.hadoop.thriftfs.DatanodePlugin</value>
  <description>Comma-separated list of datanode plug-ins to be activated.
  </description>
</property>
<property>
  <name>dfs.thrift.address</name>
  <value>0.0.0.0:9090</value>
</property>
Add the following to mapred-site.xml:
<property>
  <name>jobtracker.thrift.address</name>
  <value>0.0.0.0:9290</value>
</property>
<property>
  <name>mapred.jobtracker.plugins</name>
  <value>org.apache.hadoop.thriftfs.ThriftJobTrackerPlugin</value>
  <description>Comma-separated list of jobtracker plug-ins to be activated.
  </description>
</property>
To enable full monitoring in the Health application, the metrics
contexts must not be NullContext. You might configure hadoop-metrics.properties
like so:
# Exposes /metrics URL endpoint for metrics information.
dfs.class=org.apache.hadoop.metrics.spi.NoEmitMetricsContext
mapred.class=org.apache.hadoop.metrics.spi.NoEmitMetricsContext
jvm.class=org.apache.hadoop.metrics.spi.NoEmitMetricsContext
rpc.class=org.apache.hadoop.metrics.spi.NoEmitMetricsContext
If you are setting $HADOOP_CLASSPATH in your hadoop-env.sh, be sure
to set it in such a way that user-specified options are preserved. For example,
# Good
HADOOP_CLASSPATH=<your_additions>:$HADOOP_CLASSPATH

# Bad
# HADOOP_CLASSPATH=<your_additions>
This will enable certain portions of Cloudera Desktop to add to Hadoop’s classpath using the environment variable.
If your users are likely to be submitting jobs both using Cloudera Desktop
and from the same machine, they will be doing so as the cdesktop
user if they’re using Cloudera Desktop and as the their own username
if they’re using the command line. This yields to some contention
on the directory specified by hadoop.tmp.dir, which defaults
to /tmp/hadoop-${user.name}.
Specifically, hadoop.tmp.dir is used to unpack jars in bin/hadoop jar.
One work around to this is
to set hadoop.tmp.dir to /tmp/hadoop-${user.name}-${cdesktop.suffix}:
<property>
  <name>hadoop.tmp.dir</name>
  <value>/tmp/hadoop-${user.name}${cdesktop.suffix}</value>
</property>
Unfortunately, when the variable is unset, you’ll end up
with directories named /tmp/hadoop-user_name-${cdesktop.suffix} in
/tmp. The job submission daemon, however, will
At this point you should restart all of the daemons in your cluster so that the plugins can be loaded.
You can confirm that the plugins are running correctly by tailing the daemon logs:
$ tail --lines=500 /var/log/hadoop-0.20/hadoop*namenode*.log | grep ThriftPlugin
2009-09-28 16:30:44,337 INFO org.apache.hadoop.thriftfs.ThriftPluginServer: Starting Thrift server
2009-09-28 16:30:44,419 INFO org.apache.hadoop.thriftfs.ThriftPluginServer: Thrift server listening on 0.0.0.0:9090
| Configuring Your Firewall for Cloudera Desktop |
|---|---|
Cloudera Desktop currently requires that the machines within your cluster can speak to each other freely over TCP. The machines outside your cluster only need to be able to open TCP port 8088 on the Cloudera Desktop Server to interact with the system. |
Cloudera Desktop ships with a default configuration that will work for pseudo-distributed clusters. If you are running on a real cluster, you’ll need to make a few small changes to its configuration file. Here we go through the key configuration options.
Edit /etc/cloudera-desktop/cloudera-desktop.ini in your favorite editor.
| Full Listing of Configuration Options |
|---|---|
In order to see a full listing of the available configuration options, you can run: /usr/share/cloudera-desktop/env/bin/desktop config_help | less This will outline the various sections and options in the configuration, as well as provide help and information on the default values. |
| View Current Configuration Options |
|---|---|
You can also view the current configuration from within Cloudera Desktop, at: http://<cloudera_desktop>/dump_config |
| Using Multiple Files to Store Your Configuration |
|---|---|
Cloudera Desktop will load and merge all of the files with extension |
Cloudera Desktop uses the CherryPy web server. You can change the IP address
and port the web server listens on, which is port 8088 on all configured IP
addresses. (Use http_host and http_port.)
By default, the first user who logins to Cloudera Desktop may choose any username and password, and becomes an administrator automatically. This user may create other user and administrator accounts. User information is stored in the Django backend, in the Django database.
To use PAM authentication, follow the instructions under the [[auth]]
section of the file. Note that under PAM authentication mode, the
User Manager application does not update your system accounts.
| Password Security and PAM Authentication |
|---|---|
Cloudera Desktop does not ship with SSL enabled by default. If you choose to enable PAM authentication, be aware that HTTP is not an encrypted protocol and users' authentication details may be revealed over the network. |
You can configure Cloudera Desktop to serve over HTTPS. To do so, you’ll need to install "pyOpenSSL" within Desktop’s context and configure your keys.
To install pyOpenSSL, from the root of your Desktop installation
(/usr/share/cloudera-desktop if you installed from packages, type)
execute:
$ ./env/bin/easy_install pyOpenSSL
Then, configure Cloudera Desktop to use your private
key by putting the following inside your
/etc/cloudera-desktop/cloudera-desktop.ini:
ssl_certificate=/path/to/certificate
ssl_private_key=/path/to/key
Ideally, you would have an appropriate key signed by a Certificate Authority.
If you’re just testing, you can create a self-signed key using the openssl
command, that may be installed on your system:
# Create a key
$ openssl genrsa 1024 > host.key
# Create a self-signed certificate
$ openssl req -new -x509 -nodes -sha1 -key host.key > host.cert
If your Hadoop cluster is made up of multiple nodes, you should configure
Cloudera Desktop to point to the external hostnames of your Namenode and
JobTracker. To do so, simply change the namenode_host and jobtracker_host
lines in the configuration file. The inline comments in the existing file will
guide you.
Once your cluster is up and running with the plugins enabled, you can start Cloudera Desktop. On your Cloudera Desktop Server, run:
# service cloudera-desktop restart
Congratulations! Your Cloudera Desktop installation is now up and running!
Now that you’ve installed and started Cloudera Desktop, you can feel free to skip ahead to Using Cloudera Desktop. Administrators may want to refer to this section for more details about managing and operating a Cloudera Desktop installation.
Cloudera Desktop runs several processes under the hood, all managed by a script
called the supervisor. The supervisor is a watchdog process — its only purpose
is to spawn and monitor other processes.
A stock Desktop installation will spawn and monitor the following processes:
* runcpserver - a web server based on CherryPy that provides the core web functionality of Cloudera Desktop
* jobsubd - a daemon which handles submission of jobs to Hadoop
* run_healthd - a daemon which constantly monitors the health of nodes in your Hadoop cluster
If you have installed other applications into your Desktop instance, you may see other daemons running under the supervisor as well.
We can see the supervised processes running in the output of ps:
[todd@monster01 ~]$ ps -f -u cdesktop
UID        PID  PPID  C STIME TTY          TIME CMD
cdesktop  7899     1  0 12:14 ?        00:00:00 /usr/share/cloudera-desktop/env/bin/python2.4 \
  /usr/share/cloudera-desktop/env/bin/supervisor -p /var/run/cloudera-desktop/s
cdesktop  7903  7899  1 12:14 ?        00:02:59 /usr/share/cloudera-desktop/env/bin/python2.4 \
  /usr/share/cloudera-desktop/env/bin/desktop runcpserver
cdesktop  7906  7899  0 12:14 ?        00:00:00 /usr/share/cloudera-desktop/env/bin/python2.4 \
  /usr/share/cloudera-desktop/env/bin/desktop jobsubd
cdesktop  7907  7899  0 12:14 ?        00:00:12 /usr/share/cloudera-desktop/env/bin/python2.4 \
  /usr/share/cloudera-desktop/env/bin/desktop run_healthd
Note that the supervisor will automatically restart these processes should they fail for any reason. If the processes fail repeatedly within a small time window, the supervisor itself will shut down.
Cloudera Desktop RPMs and Debian packages ship with an init.d script to manage the Cloudera Desktop processes.
You can start and stop the Desktop Supervisor using this init script, for example:
# /etc/init.d/cloudera-desktop stop
If for some reason the init scripts are unable to stop the process, you can kill the daemon manually by locating and
killing the supervisor process as described above.
The Cloudera Desktop logs are found in /var/log/cloudera-desktop if you have installed via your package manager,
or /path/to/cloudera-desktop/logs if you’ve installed via a tarball. Inside the log directory you will find
stderr and stdout logs for each of the processes described above.
If users on your cluster experience issues, you can often find error messages in these log files.
If you are unable to start Cloudera Desktop from the init script, the supervisor.stderr log file can often
contain clues.
The cpserver.stderr log file provides an access log for all requests against the Desktop web server.
We recommend that production installations configure log rotation software like logrotate to periodically
rotate and archive these logs.
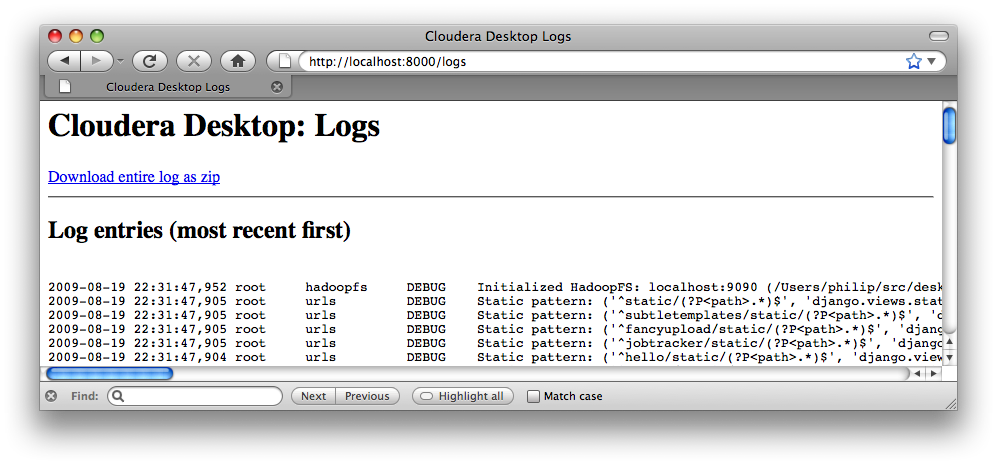
In addition to logging INFO level messages to the log directory, the Desktop web server keeps a small buffer
of log messages at all levels in memory. You can view these logs by visiting http://myserver:8088/logs.
The DEBUG level messages present here can sometimes be helpful in troubleshooting issues.
Cloudera Desktop requires a SQL database to store small amounts of data, including user account information as well as history of job submissions and Hive queries. By default, Desktop is configured to use the embedded database SQLite for this purpose, and should require no configuration or management by the administrator.
The default SQLite database used by Cloudera Desktop is located in /usr/share/cloudera-desktop/desktop/desktop.db.
You can inspect this database from the command line using the sqlite3 program. For example:
# sqlite3 /usr/share/cloudera-desktop/desktop/desktop.db
SQLite version 3.3.6
Enter ".help" for instructions
sqlite> select username from auth_user;
admin
test
sample
sqlite>
We strongly advise you not to make any modifications to the database directly using SQLite, though this trick may be handy for management or troubleshooting.
To back up the Desktop Database, you can simply copy the desktop.db file to another node. We recommend that
you back it up on a regular schedule, and also that you back it up before any upgrade to a new version of
Cloudera Desktop.
Although SQLite is the default database type, some advanced users may prefer to have Desktop access an alternate database type. Please note that, if you elect to configure Desktop to use an external database, upgrades may require more manual steps in the future.
Here we provide instructions for MySQL, though Desktop may also be made to work with other common databases including PostgreSQL, Oracle, etc.
First, you must create a new database in MySQL and grant privileges to a desktop user to manage this database.
mysql> create database desktop_example;
Query OK, 1 row affected (0.01 sec)

mysql> grant all on desktop_example.* to 'desktop_user'@'localhost' identified by 'secretpassword';
Query OK, 0 rows affected (0.00 sec)
Next, shut down Desktop if it is running, and edit cloudera-desktop.ini. Directly below the
[desktop] line, add the following:
[[database]]
host=localhost
port=3306
engine=django.db.backends.mysql
user=desktop_user
password=secretpassword
name=desktop_example
Next we need to install the python drivers for MySQL into Desktop’s environment:
# su - cdesktop -s /bin/bash
$ /usr/share/cloudera-desktop/env/bin/easy_install MySQL-python
Now, still as the cdesktop user, we instruct Desktop to create the necessary database tables:
$ /usr/share/cloudera-desktop/env/bin/desktop syncdb --noinput
Now you are all set up and can start the Cloudera Desktop server as normal.
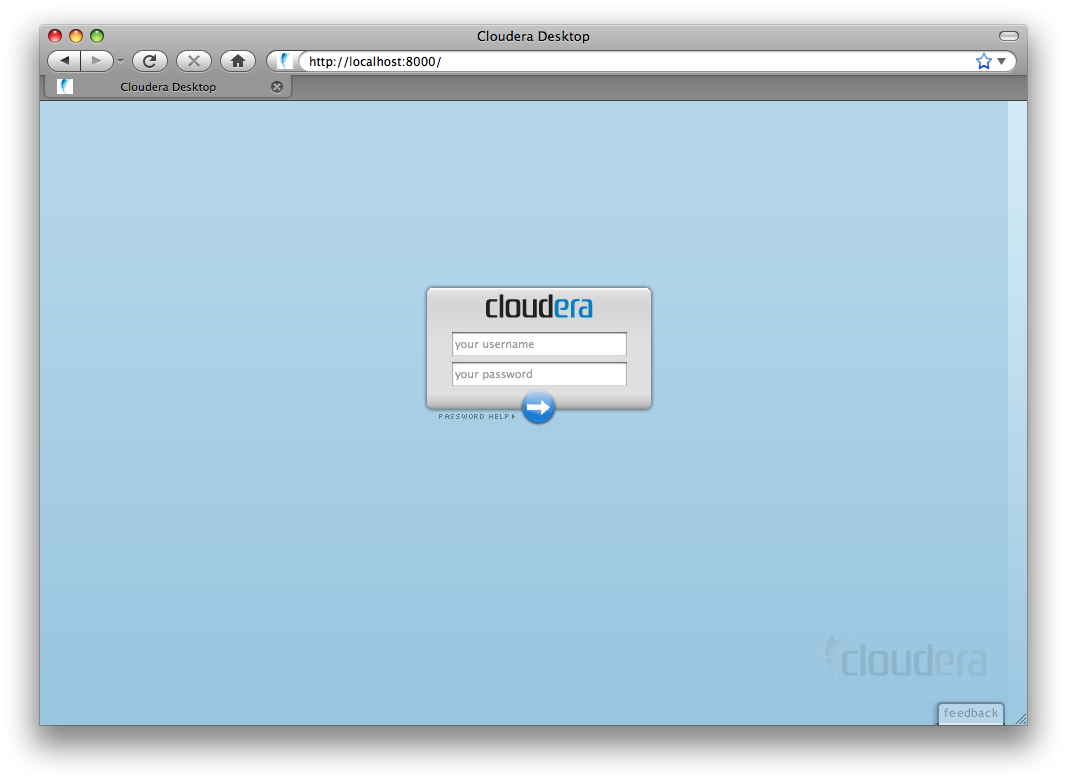
After installation, you use Cloudera Desktop by simply navigating to http://myserver:8088/.
You’ll be greeted with a login screen:
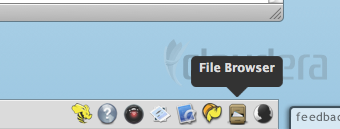
After login, you’ll be greeted with a welcome screen.

Launch applications on the top-right.
The Help application, visible in the screenshot above, guides users through the various installed applications.
Cloudera Desktop is primarily tested on Firefox 3.5 and Firefox 3.6, on Windows, Mac, and Linux. Google Chrome and Safari work as well. Support for Internet Explorer is forthcoming.
Cloudera Desktop 0.4.1 is currently in private beta. We’re excited to receive your feedback and criticisms. We expect that you may uncover some bugs and mishaps. The best way to send feedback is to send us e-mail, at desktop-feedback@cloudera.com.
If you find that something doesn’t work, it’ll often be helpful to include logs
from your server. These are available at the /logs URL on Desktop’s webserver
(not part of the graphical Desktop UI). Please download the logs as a zip (or cut
and paste the ones that look relevant) and send those with your bug reports.