
Table of Contents
![]()
Flume v0.9.3 is the first version of Flume to support Windows-based Flume nodes. It has been tested on Window Server 2003 SP2 and Windows XP SP3 machines and can be used to collect logs generated from Windows applications such as Microsoft IIS.
Requirements:
![[Note]](images/note.png) | Note |
|---|---|
We require using the 32-bit JVM even on 64 bit machines because of lower memory footprint. |
Flume for Windows is installed using an executable installer generated by Nullsoft Scriptable Install System (NSIS). It provides a simple wizard which presents basic options for a node’s configuration settings. It will install the software and optionally start a Flume node as a Windows service (daemon).
| Note |
|---|---|
Before reinstalling the Flume on Windows service, use the
Windows Services Management Console to stop the |
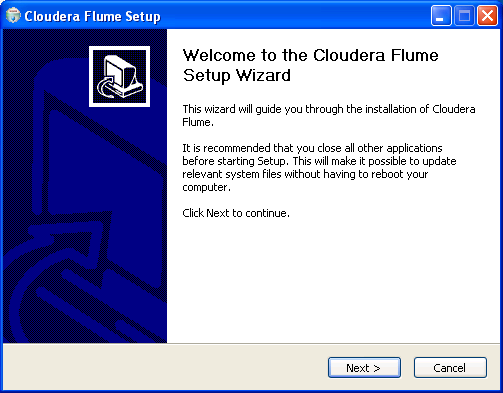
When you start the Flume for Windows installer, the following dialog box appears. Click "Next".
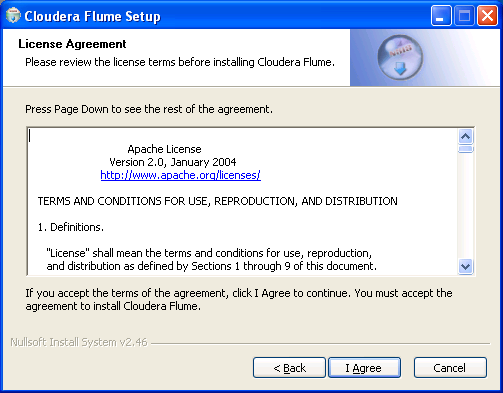
Read the license agreement and then click "I Agree".
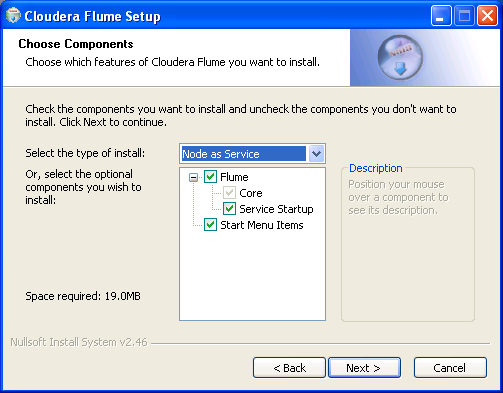
In the drop-down menu in the following dialog box, specify whether you want to install the Flume node core software, or install the Flume node core software and install it as a Windows service. Installing as a service will add the Flume node service that is started when the machine is rebooted.
Select the components you want to install and then click "Next" to continue.
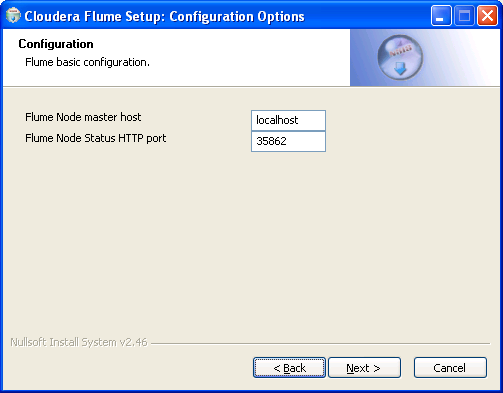
Specify the Flume node’s master location. The default is "localhost" which specifies the current machine. To specify a different machine, enter either its IP address or machine name. Also, specify the TCP port for node-to-master communications. The default port is 35862. Click "Next" to continue.
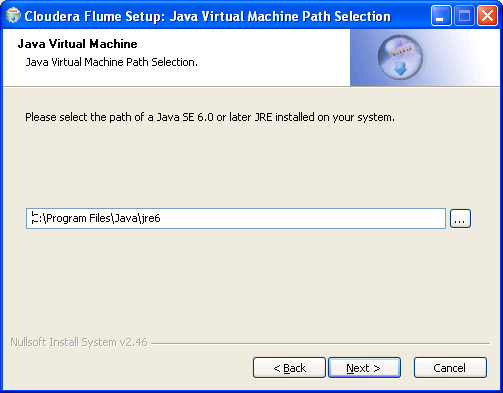
Next the installer attempts to automatically detect the location of an installed Java Runtime Environment (JRE). If the JRE is not found, manually specify the path. Click "Next".
![[Warning]](images/warning.png) | Warning |
|---|---|
Currently the installer requires a 32-bit JVM. Using a 64-bit JVM is not supported yet. |
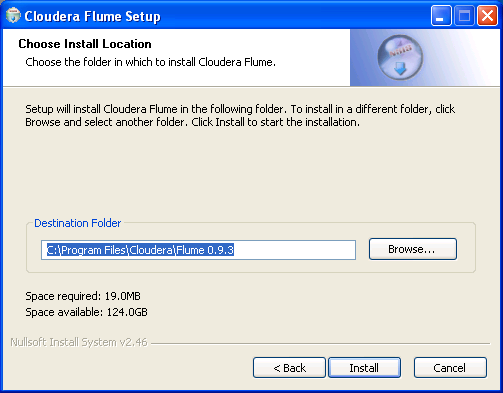
Specify the directory where you want to install the Flume for Windows components, and then click "Install".
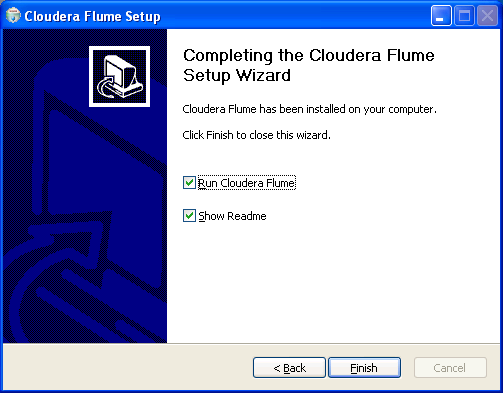
After installation is complete, the following dialog box appears. Click "Finish".
You can confirm that the Flume node is up by:
flumenode.exe service is started in the Windows
Task Manager or in the Windows Services Management Console
![]()
Installation by default will set up the Flume node to automatically start when the Windows machine is booted. You can manually start and stop the Flume node service by using:
sc (service controller) windows command line program
You can use the tray icon applet to start, stop, or restart the Flume node service. You can access the commands by right clicking on the tray icon and displaying the following menu:
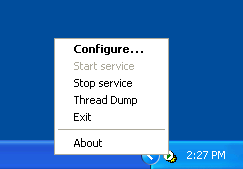
Click "Configure…" to change the Flume node service configuration settings, such as JVM parameters and the Restart-on-reboot mode.
| Note |
|---|---|
Flume relies on Apache Common Daemon’s |
Alternately, you can start and stop the Flume node service by typing the following commands (as the Administrator) at the Windows command prompt:
C:\> sc FlumeNode start
C:\> sc FlumeNode stop
Run sc for more details and options.
Unfortunately, the install, delete, and create methods do not
always work. To manually install and uninstall the Flume node
service, run the following scripts from the command prompt (as
Administrator) at the Windows command prompt:
%FLUME_HOME%\bin\> flumenode-service.bat install

$FLUME_HOME%\bin\> flumenode-service.bat remove
| Warning |
|---|---|
Uninstalling Flume node may not be completed cleanly. You
may need to stop |
The installation directory where the Flume node programs are installed
is called %FLUME_HOME%. By default this is C:\Program
Files\Cloudera\Flume 0.9.3\.
| Directory | Purpose |
|---|---|
| %FLUME_HOME%\logs | Directory where Flume node logs are saved. |
| %FLUME_HOME%\conf | Directory where flume-site.xml and flume-conf.xml are located |
The FLUME_CONF_DIR environment variable is respected — you can keep
xml configs in a separate directory pointed to by this variable for
customized configurations.
To build Flume for Windows, you need:
With cygwin the normal Unix build process can be used. For example, assuming you are in the Flume project directory, type this command:
~/flume$ ant
To generate the Flume installer executable, run the following special ant filter to inject the proper build-specific versions information:
~/flume$ ant winstall-filter
You can build the Flume for Windows installer manually. Start NSIS,
and then click "Compile NSI script". In the dialog box that opens,
select "File | Load script…" from the menu. Select flume/flume.nsi,
and then click "Open". This will compile the script and generate the
installer, flume-installer.exe. This file should be located in the
main Flume project directory.